Identity Providers
You can configure user authentication to be provided from a SAML or OAuth based Identity Provider. In order to use this method of authentication users must have been created ahead of time, either manually, or from a CSV file.
To configure, access the Identity Provider section of the System settings tab.
Configuring SAML 2.0
After you have selected to add a new provider, enter a name, registration ID and select SAML 2.0. Following this you must configure the tabs below:
 Identity Provider Settings
Once you have defined a name and Registration ID you have the following options are available on the Identity Provider Settings
| Name |
Defined when adding the provider, the name you want to give this connection. |
| Registration ID |
The Registration ID you have given associated with the authentication provider. |
| Map By Email? |
Select this to map the emails provided by the remote system, to those already provided in your 1Data Gateway installation.
Creates identity provider links as users log in.
If you do not select Map By Email you will need to configure Identity Provider links manually. See the Manually adding Identity Provider Links section for more.
|
| Email Attribute |
The name of the attribute that contains emails in your identity provider |
| SSO Required? |
Select to force users to connect to 1Data Gateway through single sign on. If this is set the user accounts linked to the IDP cannot login using a 1DG-local password and must authenticate against the remote system.
|
Service provider Settings
| Entity ID |
The URI location for the Identity Provider you will be using. |
| SSO Service Location |
The URI location for the Single Sign On service you will be using. |
Identity Provider Signing
Upload your certificate to this panel, and select validate responses.
Note: The certificate presented must be a PEM file.
Service Provider Signing
| Sign Auth Requests? |
Select to enable the signing of Auhtorisation Requests |
| Service Provider Certificate |
The generated service provider certificate |
| Service Provider Private Key |
The generated service provider private key |
OAuth 2.0 Authentication
Once you have selected to add a new provider, enter a name, registration ID and select OAuth 2.0
For detailed information OAuth configuration, please refer to OAuth documentation.
Identify Provider Settings
After you have done this you must configure the following tabs:
| Name |
Defined when adding the provider, the name you want to five this connection. |
| Registration ID |
The Registration ID you have given associated with the authetication provider. |
| Map By Email? |
Select this to map the emails provided by the remote system, to those already provided in your 1Data Gateway installation.
Creates identity provider links as users log in.
If you do not select Map By Email you will need to configure Identity Provider links manually. See the Manually adding Identity Provider Links section for more.
|
| Email Attribute |
The name of the attribute that contains emails in your identity provider |
| SSO Required? |
Select to force users to connect to 1Data Gateway through single sign on.
Note: If this is set, the user accounts linked to the IDP cannot login using a 1Data Gateway local password and must authenticate against the remote system.
|
Service Settings
| Authentication Method |
Select which method should be used to make the User Info request |
| Client Id |
The client Id associated with the OAuth registration. |
| Client Secret |
The client secret associated with the OAuth registration. |
| Scopes |
Define the scope to limit access to specific values in the users account e.g: email
Note: The name of these values will change depending on the values within your setup.
|
| Authorisation Uri |
The location of the authorisation token for the OAuth connection. |
| Token URI |
The location of the OAuth token. |
| Jwk set URI |
The location of a JSON Web Key used for authentication. |
| User Info URI |
The location of the users information where the tokens are sent. |
| User Name Attribute Name |
The name of the attribute in your authentication provider configuration that stores the Users names. |
| User Info Authentication Method |
What method should be used to make the Authentication request |
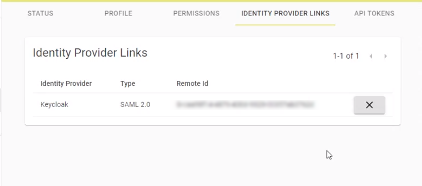
Manually adding Identity Provider Links
If you have opted to manage Identity Provider Links manually, on a user-by-user basis, you can do so in the Identity Provider Links tab. To navigate this:
- Select the User tab in the navigation panel
-
Click the edit icon  on your chosen User to start editing the User details.
-
Select the Identity Provider Links tab
-
By selecting the  icon you can add Identity Providers.
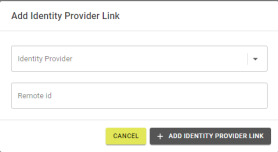
Here, you can manually add identity provider links by selecting the provider and entering the Remote ID for that user.


