
Selecting Data
Click or tap on the map to select a feature.
Note: When you select a feature, any previously selected features are deselected first.
Click ![]() in the Context bar to clear the selection.
in the Context bar to clear the selection.
Once a feature is selected, its attributes are displayed in the Properties Panel (see Feature Attributes).
When you tap at a location to select, a priority is applied. Points at that location are selected ahead of lines, which are then selected ahead of polygons. So if you tap on a point feature on a line feature that runs along the boundary of an area, the point is selected first.
If there is a possible ambiguity at the location you tapped (e.g. if there are two features of equally high priority), a pop-up menu is displayed to allow you to select the feature.
If a thematic layer has been defined for any feature classes displayed in the pop-up menu, the value of this attribute is displayed and styled according to the thematic layer.
Note: Features are selected if they are within snapping tolerance of the click location. Tolerance is defied in the 1Edit Settings panel (see 1Edit Settings).
In the following example, there are several BoundaryArea polygons that are within snapping tolerance of the clicked point. These BoundaryArea polygons have a thematic layer based on the "boundary type" attribute, which displays different types of boundary in different colours.
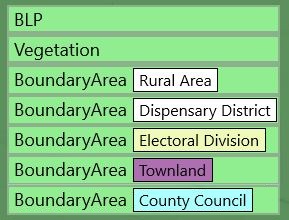
Multiple BoundaryArea polygons within the tolerance of a clicked point
Selecting Multiple Features
You can select multiple features either by turning on multi-select mode in the 1Edit settings and selecting other features to add to the selection, or by holding Ctrl while selecting features.
When multiple features are selected, only one feature's properties and vertices are shown at a time (see Feature Attributes and Feature Vertices). You can step through the selected features using the previous and next arrows on the properties panel.

Note: You can update the attributes of multiple features at the same time using the Multi Feature Update panel (see Multi Feature Update).
Selecting Features with more than one Geometry
For features with more than one geometry (see Features with Multiple Geometries), you must click on the primary geometry to select any of the geometries of a feature. If a secondary geometry extends outside of the primary geometry, you can only select it by clicking inside the primary geometry first.
When you click on the primary geometry of a multi-geometry feature, both the primary and any secondary geometries are shown in the selection popup list. Click on the primary geometry (listed first) to select and edit the primary geometry of the feature.
Click on a secondary geometry (listed, indented after the primary geometry) to select and edit that secondary geometry. If that secondary geometry of the feature is not yet defined, selecting it allows you to create the secondary geometry; you can then use the Create data bar to create the geometry for the selected feature.

Copyright © 2019 1Spatial

