Configuring GPS Devices
GPS Device settings are accessed from the Settings menu in the Upper and Lower App Bars.
Add a GPS device
Open the Lower app bar and select Settings > Survey Devices.
-
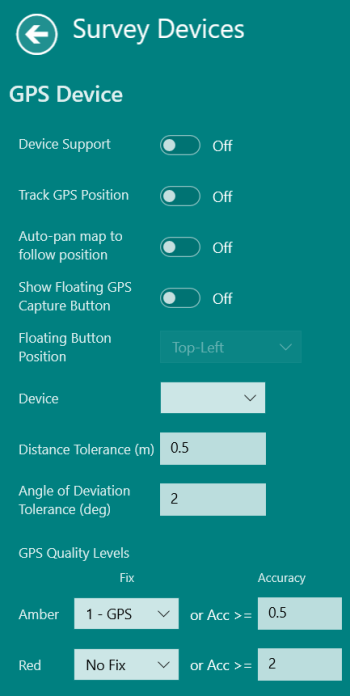
To add a GPS device, toggle Device Support to On.
-
Track GPS Position (Optional) - Track your current GPS position (whether or not you are capturing points with your device).
-
Auto-pan map to follow map position (Optional) -Automatically centre the map to your current position when using manual or continuous GPS capture, toggle.
-
Show Floating GPS Capture Button (Optional) - Display a larger GPS Capture button on top of the main map screen. This can be positioned in one of the 4 corners of the screen, click the button to capture a point. The GPS Capture button is coloured green, amber, or red to reflect current GPS quality.
-
Floating Button Position (Optional) - Select where to display the floating GPS Capture button

-
In the Device list select the GPS device from the list of connected Bluetooth devices
-
In the Distance Tolerance field, enter a distance in dataset units.
This is used to define the minimum distance between captured points when doing continuous capture (see Continuous Capture).
-
In the Angle of Deviation Tolerance (deg) field, enter an amount (in degrees) to control how far to deviate from a straight line before a new point is captured. This prevents lots of redundant points along a straight line being captured.
Set this value to 0 if you want to capture all points.
-
Click the back arrow to close the menu and save your settings.
-
Open the lower app bar and select Devices > GPS.
The GPS Status panel is displayed.
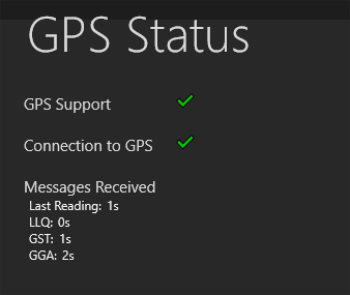
GPS Status panel Refer to any messages in this panel to resolve any issues. The messages received section indicates data that is received from the GPS device and when the tablet last received a message. This may help determine when there are problems with connectivity.
GPS Quality Levels
1Edit uses a traffic light system to indicate GPS position accuracy:
-
Green - The position quality is sufficient. Data capture is allowed.
-
Amber - The position quality is lower. User is prompted to accept or reject the data.
-
Red - The position quality is too low. Data capture is blocked.
You can configure these levels using the GPS Quality Levels setting.
A combination of Fix (mechanism used to obtain the position) and Accuracy is used for Leica GPS devices. Fix and DOP (Dilution of Precision) is used for Trimble GPS devices.
Leica

- In the Fix drop-down lists, select No Fix, 1 - GPS, 2 - DGPS, or 3 - HPN for both the Amber and Red fields. These values are inclusive, so when the fix drops to the specified level, the warning is displayed.
- In the Accuracy fields, enter values (in meters) for both Amber and Red.
-
GPS Quality Levels are determined by both the Fix and the Accuracy.
-
If the Fix is No Fix OR the Accuracy is greater than or equal to 2, then a Red quality level is indicated.
-
If the Fix is GPS OR the Accuracy is greater than or equal to 1 (even if the fix is DGPS), then a yellow quality band is indicated.
-
If the Fix is DGPS OR higher and the Accuracy is less than 1, then a Green quality band is indicated.
In the example above:
Trimble
Note: The Fix values that correspond to each band are set in your system configuration. Please contact your administrator to make changes.
-
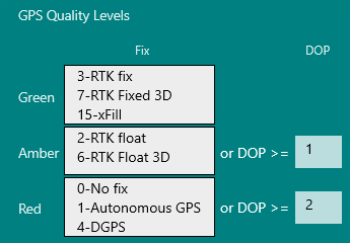
Enter the expected values in the DOP fields for both Amber and Red.
-
The GPS Quality Levels checks both the Fix and the DOP.
In the example above:
-
If the Fix is No Fix, Autonomous GPS, DGPS, OR the DOP is greater than or equal to 2, then a Red quality level is indicated.
-
If the Fix is RTK Float or RTK Float 3D OR the DOP is greater than or equal to 1, then a yellow quality band is indicated.
-
If the Fix is RTK Fix, RTK Fixed 3D, OR xFill and the DOP is less than 1, then a Green quality band is indicated
-


