
Build Topology Process
A Process is used to apply topology structuring and snapping to your data.
A Topology build Process defines the topology model, snapping types and the list of classes from which to build topology. The order defines how things snap: Classes later in the list snap to the classes earlier in the list, but any subsequent inserts and updates to features will snap those features to any existing topology.
Note: Only a single process should be added to a Ruleset. Even though multiple can be added to one or more Packages within a ruleset, only one of these will be used. In order to guarantee which settings are used then only add a single process within a ruleset or ensure that they all have the same settings
It is often used in conjunction with Rules, Actions and a Commit Task in order to correct errors in the structuring and then commit the data back to the data store.
A topology rule includes checks that allow you to identify more specifically where a particular operation passed or failed.
A topology action allows you to enhance the build topology task so that errors in the structuring are minimised, or correct errors that have already occurred.
Note: You can decide how to run actions and rules according to your structuring requirements. For example, you can perform an action after a rule, or perform an action before a build topology task.
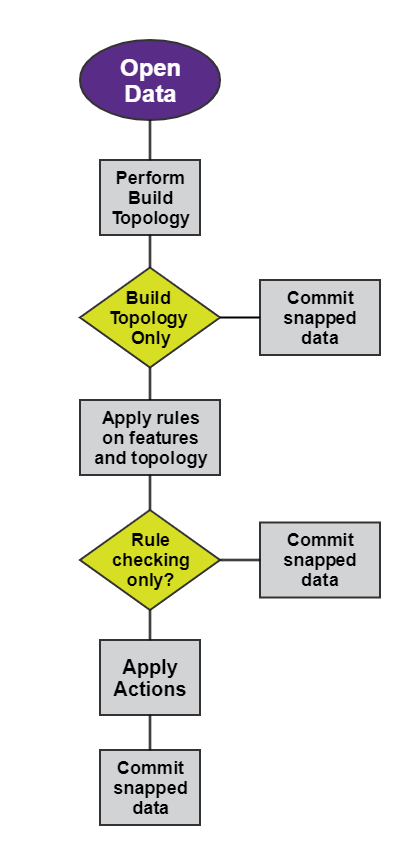
Typical Topology Flowchart
![]() Add a Build Topology Process to a session
Add a Build Topology Process to a session
 icon.
icon. . The order
of the classes defines the snapping priority.
. The order
of the classes defines the snapping priority.Topology Build Errors
When running a build topology task, the topology of some features may not be created.
This can be due to the following:
- Invalid geometries of the features such as duplicate vertices or spikes.
- The tolerance specified in the Build Topology task is too large for the data (e.g. a line is shorter than the tolerance, or a polygon has a section narrower than the tolerance).
Features that fail do not have any corresponding topology created within the topology model; you choose whether or not any action is taken. As these features were not permitted to be topologically structured, the resulting topology is always valid.
To try and solve any errors and topologically structure all the data, try one of the following solutions:
- Geometrically clean the data using an action before running the Build Topology task. This can remove duplicate vertices and spikes in the geometries.
- Reduce the tolerance value used in the Build Topology task.
- Check that the lines and polygons are not exceedingly short and narrow. You can manually delete very short lines and polygons.
- In some cases you may need to edit the source data in a GIS (such as a MapInfo or an ESRI product) to resolve geometric inconsistencies before running the session again in 1Integrate for ArcGIS. The Build Topology XML report indicates the specific location of the topology errors.

Copyright © 2019 1Spatial
US Patent Number 9542416 B2 (2017-01-10)

