Ontology
There are two key reasons you may want to define an ontology in 1Integrate:
- To easily apply rules to a number of classes from your schema by defining a class hierarchy
- To pre-define your target model, enabling you to easily re-use existing rules.
1Integrate uses a small subset of the concepts that can be expressed using the Web Ontology Language (OWL), represented in an .OWL file you provide. For more information about the Web Ontology Language, please refer to www.w3.org/OWL/.
The Class Hierarchy
An OWL document will allow you to define a class hierarchy, including superclasses, under which sub-classes are aggregated, thus permitting a rule to be applied across all of the classes.
The class hierarchy is assembled in the OWL file from subClassOf elements, e.g.
<owl:Class rdf:ID="A-Road">
<rdfs:subClassOf>
<owl:Class rdf:ID="Roadway"/>
</rdfs:subClassOf>
</owl:Class>
 Example
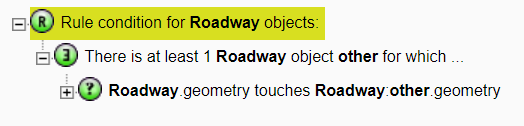
You could have classes that include A-Roads, B-Roads and Motorways. You may want to apply a rule across these classes, but it would be time consuming to apply a rule on a class by class basis.
In the case of this example, defining a class hierarchy would make it easier to apply a rule across A-Roads, B-Roads and Motorways:
| Superclass
|
Roadway |
|
|
A-Road |
|
|
B-Road |
|
|
Motorway |
A Class Hierarchy such as this would allow you to consolidate your rules once attributes have been defined (Attributes are covered in the next section).
By defining the superclass you can begin to apply rules across the sub-classes once attributes have also been defined.
Attributes
For attributes in ontology classes to appear in the drop down menus after a schema has been selected for context, they must be defined in the OWL file you provide, referencing a selected class or one of its superclasses. This will enable you to run rules against them with your defined ontology.
Note: A class inherits attributes from its superclasses. For further information, please refer to the Example below.
Attributes are specified from DatatypeProperty elements in the OWL file, e.g.
<owl:DatatypeProperty rdf:ID="Length">
<rdfs:range rdf:resource="http://www.w3.org/2001/XMLSchema#float"/>
<rdfs:domain rdf:resource="#Roadway"/>
</owl:DatatypeProperty>
- rdf:ID specifies the attribute name.
- rdfs:range specifies the attribute type using an XML Schema type. For supported types see the OWL Attribute Types
- rdfs:domain specifies the class within which the attribute is defined.
OWL Attribute Types
| Integer Types |
| "int" |
INTEGER |
| "positiveInteger" |
INTEGER |
| "negativeInteger" |
INTEGER |
| "nonPositiveInteger" |
INTEGER |
| "nonNegativeInteger" |
INTEGER |
| "long" |
INTEGER64 |
| "integer" |
INTEGER |
| "short" |
INTEGER |
| "byte" |
INTEGER |
| "unsignedLong" |
INTEGER64 |
| "unsignedInt" |
INTEGER |
| "unsignedShort" |
INTEGER |
| "unsignedByte" |
INTEGER |
| Boolean Types |
| "boolean" |
BOOLEAN |
| String Types |
| "string" |
STRING |
| "anyURL" |
STRING |
| "duration" |
STRING |
| "gDay" |
STRING |
| "gMonth" |
STRING |
| "gMonthDay" |
STRING
|
| "gYear" |
STRING |
| "gYearMonth" |
STRING |
| "time" |
STRING |
| "normalizedString" |
STRING |
| "token" |
STRING |
| "language" |
STRING |
| "Name" |
STRING |
| "NCName" |
STRING |
| "NMToken" |
STRING |
| "ID" |
STRING |
| "IDREF" |
STRING |
| "Entity" |
STRING |
| "XMLLiteral" |
STRING |
| Real Types |
| "float" |
REAL |
| "decimal" |
REAL |
| "double" |
REAL |
| Timestamp Types |
| "date" |
TIMESTAMP |
| "dateTime" |
TIMESTAMP |
Example
| Superclass
|
Roadway |
Length |
Length |
|
|
A-Road |
Number_of_Lanes |
Length, Number_of_Lanes |
|
|
Country_Lane |
Road_name |
Length, Number_of_Lanes, Road_name |
- A rule authored against Roadway will run on all Roadways, A-Roads and Country_Lane but only Length will appear in the attribute menu.
- A rule authored against A-Road will run on all A-Roads and Country_Lane; Length and Number_of_Lanes will appear in the attribute menu.
- A rule authored against Country_Lane will run only on Country_Lane (assuming it has no further sub-classes) and all three attributes will appear in the menu.
Note: If you are accessing a feature primarily by an attribute defined on a parent class in the ontology then, for performance reasons, ensure that the child classes all have indexes set on that attribute. If fewer than half of the child classes have that attribute indexed then the attribute index won't be used at all.
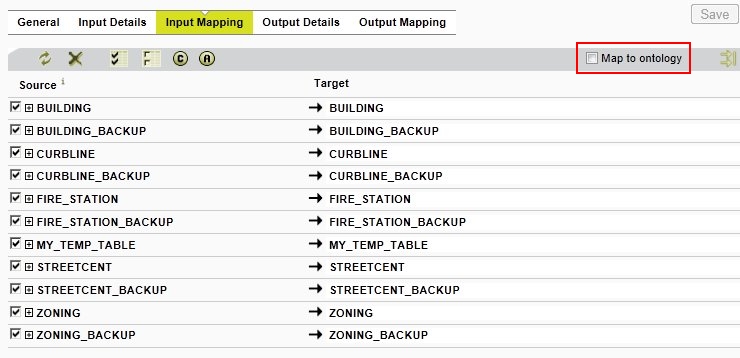
Uploading and Mapping an Ontology
You must upload your OWL file and select the ontology mapping before rule writing.
How to upload OWL files and map to Ontology
-
The Map to ontology option is selected in the Input Mapping tab within the Data Stores window of the 1Integrate UI.
-
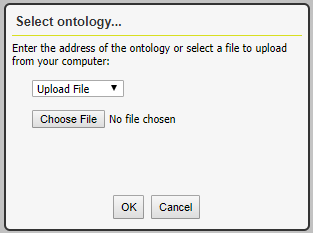
If no ontology has previously been selected, then after the Map to ontology option is ticked the Select ontology... dialogue box will be displayed. It is also displayed when the  icon is clicked.
-
The default option is to choose a file on your local file system. The file will be uploaded and parsed to extract the class and attribute information by 1Integrate.
Alternatively, the drop down menu can be changed from Upload File to Address (URL). A free form text field is used to enter the URL from which the ontology should be read. By selecting one of these options, the ontology will be saved with the data store.
Note: If the ontology uploaded is not an OWL document, an error will be displayed in the Error tab. If the document is an OWL document with a syntax error, an error may be displayed.
-
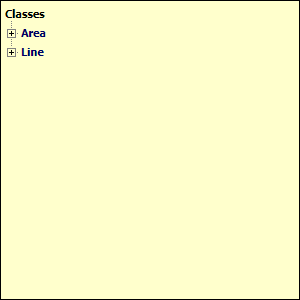
Once an ontology has been selected, you must select target mappings from the schema, defined in the ontology. It will no longer be possible to type class or attribute names or to change the type of target attributes.
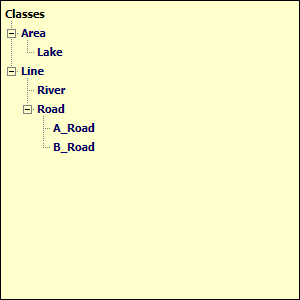
Clicking on a target class displays a class selection tool tip, initially showing only top-level classes from the ontology:
-
Clicking on the + icon to the left of the class will expand to show the immediate sub-classes, or if the node has previously been expanded, it shows the tree at the time it was collapsed. Holding down Shift whilst clicking expands all sub-classes recursively to the bottom of the class hierarchy.
-
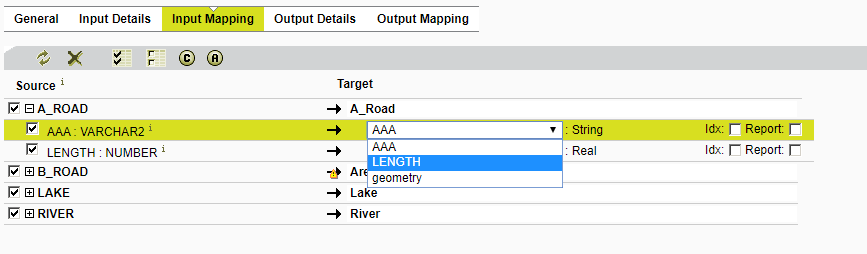
After an ontology class has been selected, the target attribute mappings can be selected from a dropdown menu. For information about attributes, see the Attributes section. The type of the matched attribute is always the type defined in the ontology, mapped onto the appropriate 1Integrate type.
Selecting target attributes
Note: Attributes that have not yet been mapped to an ontology attribute will display a warning yellow triangle on the mapping arrow  . It is recommended that all classes and attributes are mapped, but it is still possible to use the data store in a session if some classes and/or attributes are not yet mapped. Unmapped attributes will use the same name and an equivalent type as the source attribute.
-
When the mappings have been created, rules and actions can be written to apply to super classes in the ontology. These rules/actions will be applied to all sub-classes of the selected class.