Using the Context bar

The options displayed in the Context bar are specific to the geometry type selected. For example, when creating a point, the following Context bar is displayed:

Context_bar.jpg

Using the icons in this bar, you can:

Icon-undo.jpg Icon-redo.jpg

Undo and redo actions

Icon-confirm.jpg

Accept changes from the current operation

Icon-abandon.jpg

Abandon the current operation and discard the changes

Icon-deselect.jpg

De-select currently selected features

Icon-GPS.jpg

Take the next location from a GPS. To use this feature, GPS must be enabled in the Settings menu. For more information about enabling this operation, see Using surveying devices.

The last quality reading for GPS devices is displayed in the Context bar.
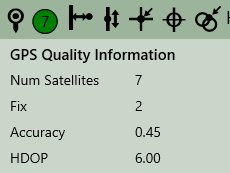
 For example:

Icon-GPS_with_signal_quality.jpg

Quality levels are indicated by a red, amber, or green button, with a number indicating the number of satellites that were available at the time of the reading. A grey button indicates an error. To view further information, click on the button. For example:

GPS_information.jpg

If the quality level is green, you can click Icon-GPS.jpg and digitise points. If the level is amber, you must confirm whether or not you want to use the captured position by clicking Accept or Cancel. If the level is red, you cannot use the current position.

If an error occurs during the capture of a coordinate reading from the GPS, a message is displayed providing further information about the error.

The quality levels refresh using the time interval entered in the Quality Refresh Interval field in the Settings menu. To dismiss this panel, click anywhere outside of the panel..

Click Icon-GPS_continuous.jpg to digitise features using continuous capture.

If the GPS signal quality drops to red, the point will not be captured. If the signal is amber, points must be set manually. Click Force Amber Capture in the Context bar to capture the point.

Icon-trace_existing_geometry.jpg

Lines or polygons only: digitise by following another feature

Icon-curve.jpg

Lines or polygons only: digitise a curve using the current vertex and the next two vertices when digitising a feature

Icon-perpendicular.jpg

Constrain the next vertex to be on a new line segment perpendicular to a selected line

Icon-constrain.jpg

Constrain to be on a specified line

Icon-intersection.jpg

Jump to the next vertex as being at the intersection of two selected lines

Icon-snap.jpg

Snap the next clicked point to the nearest location on an existing feature

Icon-bilateration.jpg

Define a location to create a point or a vertex by bilateration from two known points. Bilateration finds a point that is a specified distance from two other points.

To use bilateration mode:

  1. Using the Create data bar, select a class and digitise a point. If you want to create a vertex, digitise a line or polygon.

  2. Click Bilateration, and select the first known location on the map.

  3. In the form, enter your distance from that location and click OK.

  4. Select the second known location on the map. Enter your distance from that location, click OK.

  5. The map will now show the two points where the circles intersect. Click on the map nearest the point you wish to use and the new point or vertex will be created at this location.