1Edit Settings
Settings are accessed from the Lower App bar.
1Edit Settings
|
Setting |
Description |
|---|---|
|
Snapping |
When turned on, all clicks or taps on the map for adding vertices are snapped to any visible features. If not turned on, the snap button from the context bar can be used for snapping individual taps/clicks. |
|
Snapping Tolerance (Pixels) |
The tolerance threshold (in pixels) for how far away a feature has to be before snapping is applied. |
|
Multi Select |
When turned on, feature selections are cumulative and the previous selection is not cleared to allow you to select multiple features. If using a Keyboard, this can effect can also be temporarily achieved by holding Ctrl when clicking. |
|
Show Validation Hotspots |
When turned on, hotspot markers are shown in the area the error is to be found. For more, see Performing Validation. |
|
Show Properties Panel after Capture |
When turned on, once a new feature has been digitised it is automatically selected and the attribute browser is shown. Note: This setting will not take effect if Repeat Mode is being used, nor for functions that capture multiple features at once, such as Creating points at defined intervals. |
|
Stop Invalid Digitising |
When turned on, if a new vertex is digitised 1Edit will check that the resulting geometry will be valid and display an error message to users who try to create an invalid feature. |
|
Support Secondary Geometries |
When turned on, 1Edit lists any secondary geometries of a selected feature. This allows secondary geometries to be selected, created, or edited. Note: Only relevant when the schema contains classes with more than one geometry property. |
|
Double-Tap to Accept |
When turned on, allows double-click or double tap to be used for accepting an edit. |
|
Editing Hints |
When turned on, displays hints above the status bar to guide the user as to what input is expected during editing operations. This can be useful when training new users. |
|
Toast Notifications |
When turned on, errors encountered when digitising are shown in a pop-up window as well as in the Status bar. |
|
Zoom Buttons Visible |
When turned on, makes explicit zoom in and zoom out buttons visible on the status bar. This can be useful for users without touch screens or wheel mouse, or those using a stylus. |
|
Use simpler animations for performance |
Set this option on to use a simpler and faster method for animating to avoid performance issues on hardware that struggles with panning or zooming, or when re-drawing while moving vertices. Note: When panning or zooming out, you will not be able to see the data outside of the map window until the pan or zoom is complete, and when zooming in the image will temporarily appear pixelated until the zoom in is complete. |
|
Flip App Bars |
When turned on, swaps the position of the upper and lower app bars. This can be useful when holding a tablet in a harness against your body to make the lower app bar more easily accessible. |
|
On-the-fly Validation |
When turned on, any data edits automatically trigger validation to be performed on the edited features, and any invalid features are highlighted. |
|
Max Deviation of a curve (m) |
When capturing circles and arcs, they are densified into a sequence of straight-line segments. This value specifies how far from a true curve the vertices can deviate and therefore how many vertices to create. |
|
Squaring Tolerance |
When using the Square operation, specifies (in degrees) how close to 90 degrees an angle should be before it is squared. For example, a value of 10 degrees means that an angle that is 99 or 81 degrees will be squared, but an angle of 70 or 110 degrees will not. |
|
Deselect Feature after editing |
When turned on, specifies that after an editing operation the feature that was edited should be deselected. This setting is automatically disabled if:
|
|
Geometry Import Error Resolution |
Specify what should happen when a feature can not be loaded because its geometry is incorrect (for example, self-intersecting polygons or vertices closer that the geometric tolerance).
Note: This means that there may be missing features in your project. Note: This will try to remove identical vertices. If the problem can not be fixed, it stops loading the data and reports the error. |
|
Moving node only moves final vertex of edge |
When on, specifies that when moving a topology node only the final segment of the connected edges are moved to the final position of the node. When off, the whole geometry of the connect edges are rotated and scaled to the new position of the node. Note: Only relevant when the project has topologies defined. |
|
Infer Metadata Properties |
Note: This setting relies on specific schema naming conventions, and should be turned off unless your data uses these same conventions. When off, properties of an object are listed in the properties panel as a flat list. When on, 1Edit it looks at the names of the attributes to analyse if some are metadata of others. If a property starts with the name of another property (or the name of another property after removing '_value' from the end) then its considered metadata of the property and shown nested within an expandable list under the main property. Example: EnglishNameValue EnglishNameCaptureDate Geometry GeometryCaptureDate |
|
Disable Clipping |
Disabling clipping can have a positive impact on performance when navigating data sets with very large polygons (e.g. county sized). For most data sets with normal sized polygons it is recommended that clipping is left enabled (setting off) as it can cause a performance drain if disabled. |
|
When Logging Mode is on, 1Edit writes screen interaction events to a file. This file can be sent to 1Spatial support to provide more information when investigating and debugging any issues. This file is called Log - [datestamp].log and is created in C:\Users\[username]\AppData\Local\Packages\1Edit_qw7y987j427n8\LocalState\MetroLogs. 1 |
|
|
Open in Safe Style Mode |
If you experience an application locking issue when opening a Project and the Style uses a WMTS web service that is unstable, you can opt to open 1Edit in Safe Style Mode mode. If you select this mode then 1Edit will open the project in a style that does not use web services. Note: Remember to switch Safe Style Mode off after the web services become stable again. |
|
Show Geometry Metadata |
If on, the geometry metadata panel is expanded automatically when a new feature is selected. |
Survey Devices
1Edit supports the following survey devices:
System Colours
The colour used by 1Edit to represent features on the map can be controlled using the System Colours interface. This includes features such as the selected feature, rubber banding and validation errors .
To access this panel, open the Settings Panel and select System Colours. From here, you can change your default System Colours.
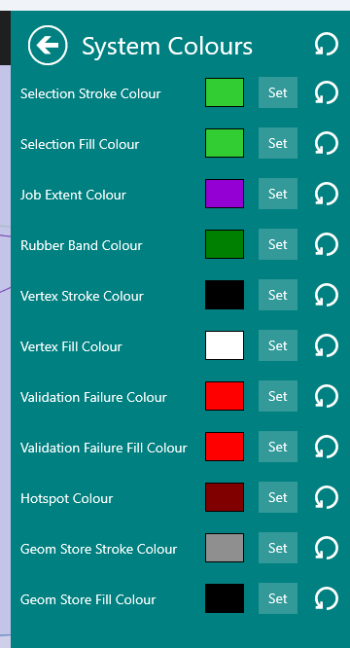
Changing the Colours
Selecting Set will open a Colour Picker. You can control the colour of your chosen function item by:
-
Using the colour wheel and the value and opacity sliders.
-
Inputting RGB and opacity values.
-
Using the hex code field.
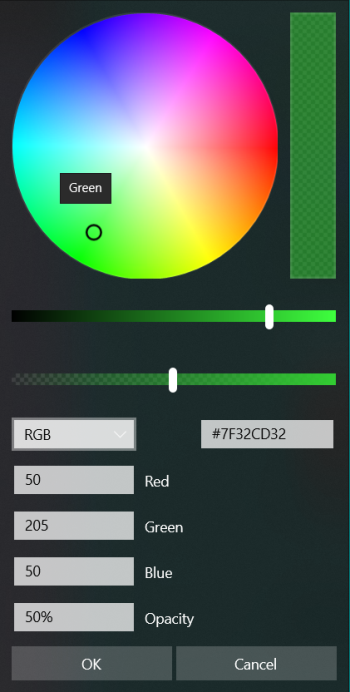
The top slide bar controls the colour range, and the bottom slide bar controls opacity.
Note: The range of the colour wheel is limited to the maximum of the red, green, or blue values. To get the full range of colours, slide the colour bar all the way to the right.
Once you have chosen your System colour, select OK to confirm. To return an item to its default value, select the Reset to Default icon  next to it. To return all to default, select the Reset All to Default icon next to the System Colours heading.
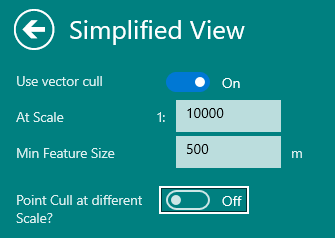
Simplified View
1Edit allows the use of a scale dependant Simplified View where small features are not drawn at higher scales. This is configured from the Simplified View section in the Settings menu.
Simplified View is used to improve rendering speed when zoomed out. When you zoom out, performance may be impacted due to the large number of features that the system needs to draw.
Note: 1Edit does not utilise scale dependant styles as they introduce their own performance issues.
The setting Use vector cull is off by default, but once enabled you are presented with the following options:
|
Setting |
Description |
|---|---|
|
Use vector Cull |
A boolean option, set On to cull vectors at a defined scale and size. |
|
At Scale |
Define the scale at which to start culling vectors. |
|
Min Feature Size |
Define the minimum vector size, in system units, at which to cull. Features smaller than the number specified in either the x or y direction will not be drawn. |
|
Point Cull at different Scale? |
A boolean option, set On to cull points at a different scale to vectors. If off whilst Use vector cull is set on then points will be culled at the same scale as vectors. |
|
At Scale |
Define the scale at which to start culling points. |
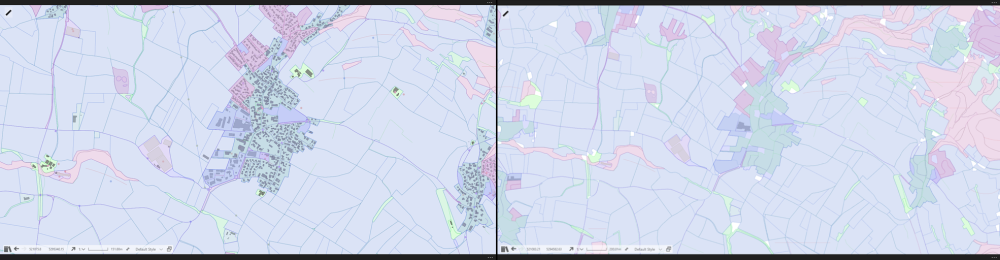
Example Simplified View Settings
In the Simplified View Settings the following options have been defined: the vector cull is At Scale 10000 and the Min Feature Size is 100.
When zoomed out to the defined scale of 1:10000 and above, features below the minimum feature size threshold of 100 will not be drawn, as in the image below:
Version Number
You can view which version of 1Edit is in use through settings, as it is displayed at the bottom of the interface.


