Rule and Action Workspace
When building both Rules and Actions you will be interacting with the Rule and Action Workspace.
The workspace allows you to build Rules and Actions in 1Integrate through its visual programming interface.
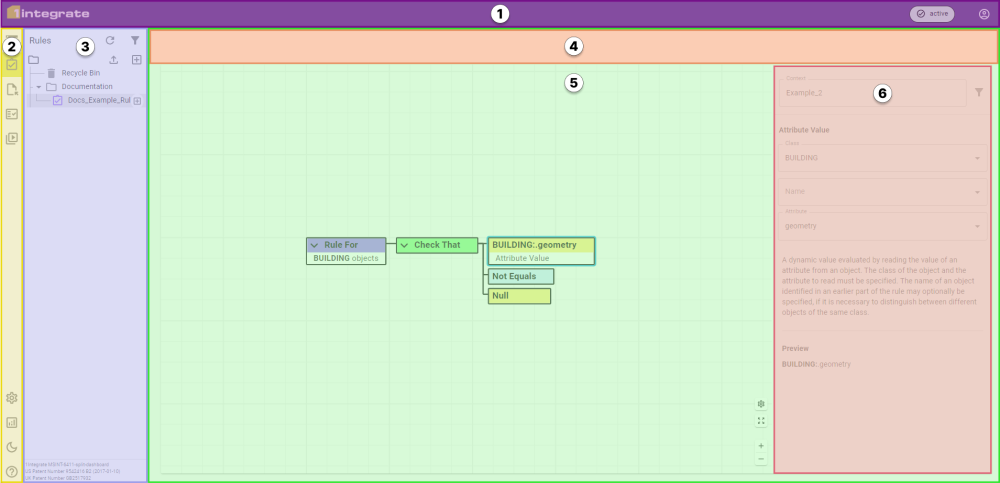
The unique interface for both Rule and Action building is the workspace (5), where Rules and Actions are constructed, and the right hand panel (6), which allows you to configure a selected component. The other parts of the interface match those used when configuring your Data Stores and Sessions.
The Workspace
Once a Rule or Action has been created, select it in the navigation pane (3) to open it in the workspace.
Rules and Actions always contain a Root Node and an empty node to its right. See Anatomy of Rules and Actions to learn how Rules and Actions are structured. Empty nodes have a + icon in their centre to show that a new component can be added there.
A node is part of a Rule or Action's structure, while a component is a type of logical instruction or value that is inserted into a node. For more on Nodes, see Nodes in Detail.
Note: For Rules, the first node after the Root is always a Predicate, for Actions, it is always an Operation.
Adding components to nodes begins the process of constructing a Rule or Action. They are always built from left to right, with branches extending into a second row, third row, etc depending on how many inputs a particular component requires.
The Right-hand Panel
The context and nodes are configured in the right-hand panel. The context sets the Data Store being referenced for the Rule or Action, see Context for more information.
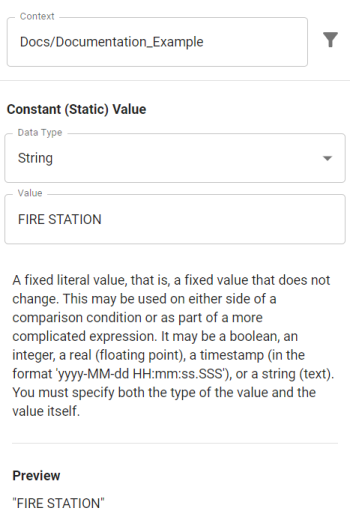
The image above shows a basic value that has been configured. Under the Context is the component type, in this case Constant (Static) Value. Beneath that are any Parameters that need to be configured for that component, in this case the component contains a String value of "FIRE STATION".
The paragraph beneath the parameters is the description of the component.
The final section is the Preview. In this case the component doesn't have any nodes after it so it only displays what the logic of this node is, "FIRE STATION", which is a string. The preview shows the logic of all subsequent nodes in the workspace.
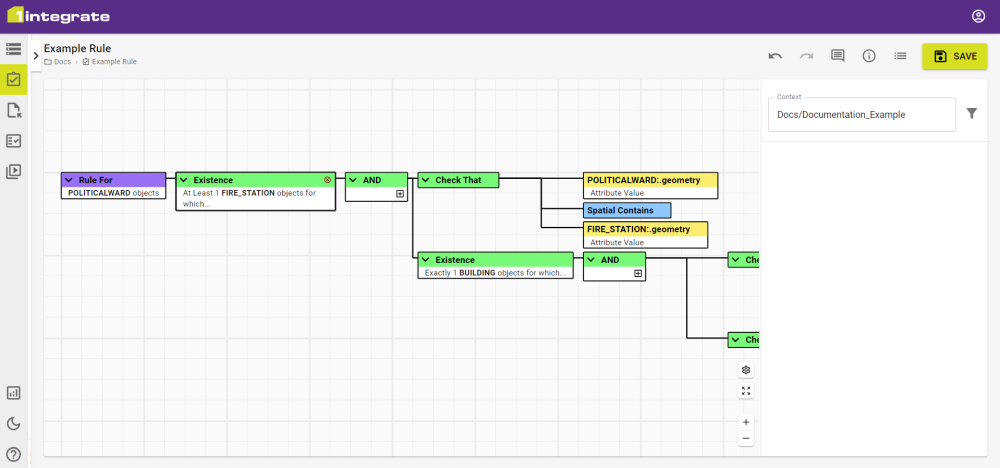
Example: A root node may look something like the following:
Check for POLITICALWARD objects that there is At Least 1 FIRE_STATION objects for which POLITICALWARD:.geometry contains FIRE_STATION:.geometry and there is Exactly 1 BUILDING objects for which BUILDING:.TYPE equals "FIRE STATION" and BUILDING:.geometry contains FIRE_STATION:.geometry


