Record Replay Debugging
Record Replay can be used on a task to debug how a fix Rules or Actions, or see where the data is failing to meet conformance.
Enabling Record Replay
Within a Session, Check Rules and Apply Action tasks can have a replay recorded by clicking the Edit button ![]() and toggling Record Replay on.
and toggling Record Replay on.
Note: If you are planning on using Record Replay it is advised that you add Non-Spatial Filtering to limit the number of processed features. Processing a large number of features may have an impact on performance, it is recommended you restrict the number of features processed to 100 or fewer.
Once enabled, run the Session as usual and after that Task has run, the replay viewer will be available from the Task Report. For each feature that can be viewed, there will be a Replay button ![]() that will take you to the replay viewer for that feature.
that will take you to the replay viewer for that feature.
Interface
The replay viewer looks similar to the Rule/Action builder. The main differences are inclusion of the Panel below the Rule/Action, the replay object and filter at the top of the right-hand panel, and the Map panel on the right.
The lower panel contains the controls and the Context Values. The Context Values lists all objects being used and next to each listing, the Attributes icon ![]() displays the attributes for that class, while selecting the Focus icon
displays the attributes for that class, while selecting the Focus icon ![]() will focus the map on it.
will focus the map on it.
Clicking the feature in the Map will display the object details panel in the same way as the Map Viewer.
|
Controls |
Description |
|---|---|
|
Restart |
Resets the current replay to the beginning. |
|
Step out |
Runs the replay until the parent node is reached. |
|
Step in |
Steps through to the next logical step in the Rule/Action. |
|
Run to next breakpoint |
If a breakpoint node has been set, this will step through until that point. If not or it has already stepped past all breakpoints, it will run to its conclusion. |
The replay object and filter shows the Rule and its location, as well as set filters on the current replay. Filters will darken the nodes that don't match, making matches more visually prominent.

Nodes in the viewer can be right-clicked to open the context menu for that node.
Except for relations, all nodes can be set as a breakpoint or conditional breakpoint. Breakpoints are nodes that can be stepped to, completing the logic of all previous steps when "Run to next breakpoint" is used.
Conditional breakpoints are only stepped to if the conditions of the manually entered expression are met. These use the same syntax as Non-Spatial Filtering.
Both breakpoint types can be removed or edited though the context menu.
The edit option will open the Rule/Action with that node selected.
Note: Making changes to Rules/Actions will cause errors when rewinding them in a Session. It is advised that a Session is rewound before edits are saved or that the Session is restarted after changes are made.
Replay
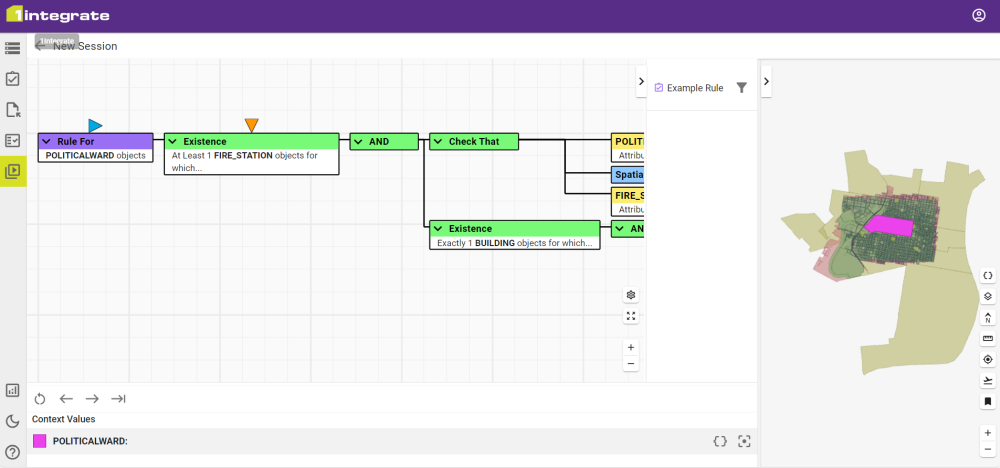
The image below shows a Rule that has been replayed to the "Check That" Predicate node. The blue triangles pointing towards the right-hand panel (in this example above the root node and the Existence node) show that the children of those nodes are currently executing.
The current node is imarked with an orange triangle, which is pointing at and placed directly above the node. In the case of this example, that is the "POLITICALWARD:.geometry" Attribute Value.
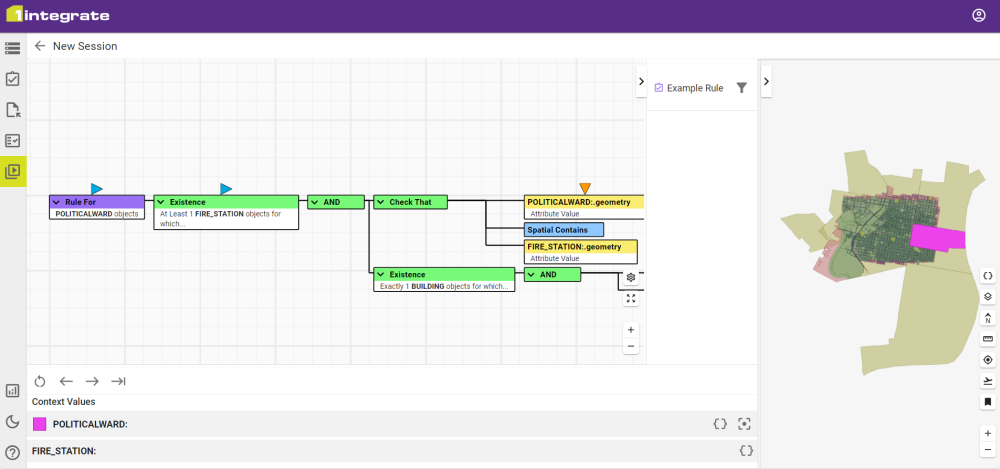
Any node that has returned a Value has a green callout box containing that value above it, such as the topmost "POLITICALWARD:.geometry" Attribute Value showing the polygon's values.
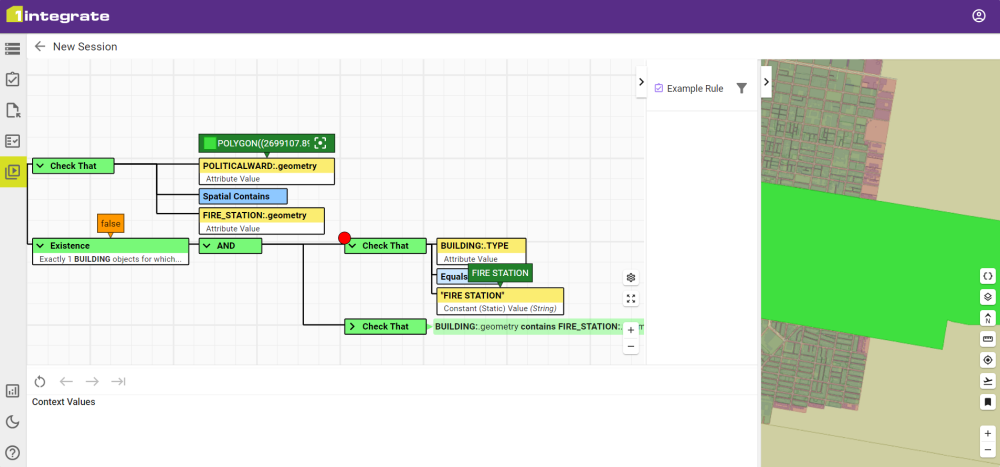
As the "Check That" node has returned the value 'false', it is displayed in an orange callout box above the node it returns the value to.
If a breakpoint has been set, it will show as a red circle placed on the node, as on the "Check That" node in the image above. A conditional breakpoint has a question mark in the red circle placed on the node.


