
Layers
Features are managed using a series of ordered layers within a style (see Map Styles).
A layer can be used to display a vector geometry, a raster file, a Web Map Tile Service (WMTS), or text based on a vector geometry.
You can have multiple layers that reference the same class.
You can specify colours and text that will be used to display features on the map, use background raster or map service layers, and specify which feature types will be displayed on the map.
Re-ordering or Removing Features
Layers are displayed from the bottom-most layer upwards.
To remove a feature layer from the Style list, select it and click Remove. The feature will no longer be displayed on the map, but can be added back again by selecting Add from the Style page.
Drag and drop feature layers in the Style list to determine in what order specific layers appear on the map.
Editing Features
Click on a feature layer to display the attributes that can be edited.
For vector items, you can change the colour of a feature's Fill, Stroke or Point styles using sliders.
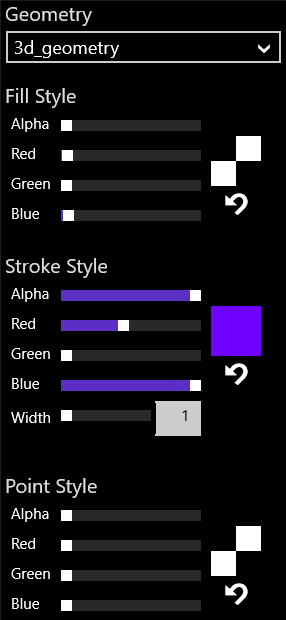
Attributes that can be edited
You can also change the width of a stroke (in pixels) using the Width slider, or by entering a value.
Note: To adjust the opacity of a colour, use the Alpha slider.
For text items, you can change the colour of the text, the font family, weight and size.

Text attributes that can be changed
Use the colour sliders to adjust the text colour, select a font style from the Font Family list, and enter a font weight and size.
You can select the text to be displayed from the Text Property list. Either select a value from one of the string, integer, or enumeration properties, or if <Fixed Text> is selected, you can enter the exact text to be displayed in the Fixed Text field.
Note: To adjust the opacity of a colour, use the Alpha slider.

Copyright © 2019 1Spatial

