Clustering 1SMS on WebLogic
This guide will establish the infrastructure and processes required to cluster a 1SMS installation on WebLogic.
A server cluster consists of multiple 1SMS instances running simultaneously and working together to provide increased scalability and reliability. A cluster will appear to clients as a single server instance because it is accessed via a load balancer. The server instances that constitute a cluster can run on the same machine, or be located on different machines but share the same data and configuration. Clusters can be active-passive, where an instance is only used when the other stops working, or active-active where both can work simultaneously and take over if the other stops working.
Check your 1SMS license agreement to ensure you have sufficient licenses for the type of clustering required.
Example Cluster System
.png)
Prerequisites
It is recommended that you use a minimum of two machines to cluster 1SMS.
Note: Do not use localhost as a reference during any stage, only use the appropriate machine names.
Load balancer
Use Load balanced endpoints for all clusters.
- The Load balancer has to be configured with persistence of session cookies enabled.
- The setting for the session time-out will need to be changed from the default 60 seconds to 0, this allows 1SMS products to work when transactions can take a significant amount of time.
Note: When using High Availability (HA) to cluster two Load Balancers as an active-passive pair, it is important to note that once the active system is configured the passive system must be restarted. If the restart is not carried out, 1Edit's Worklist can eject users whilst processing jobs.
Creating a WebLogic SOA domain for clustering
Create a standard domain as per the 1SMS installation guide Installation of 1SMS. You will also need to create a second domain with clustered SOA servers.
For further information see Oracle documentation.
Once created and started, shut down both domains and use WebLogic's template functionality (pack and unpack domain) to transfer the domains onto the second machine.
Once the domains have been transferred to the second machine, start the Admin Servers on the first machine, and enrol the node managers of the second machine to the Admin Server on the first machine.
 Verify SOA servers are clustered
- Start both soa_servers from the administration console and verify they start correctly using the appropriate node manager.
-
Go to the Enterprise Manager console (located on the first machine) and verify both soa_servers are connected and running under the SOA Cluster.
Installing 1SMS components
Authentication providers
Install Authentication Provider Setup as per a normal installation of 1SMS against the Admin Servers on the first machine.
Note: Keep two versions of your config.properties as the installation will need to be run twice for the two sets of components.
Note: Between all instances of the same component, the schemas, ports, cluster settings, Admin server settings and domain are all the same. However, the application server name and listen address change.
Install the suite on the first machine
This follows a standard 1SMS installation (1SMS Installation Wizard) and sets the servers as a unicast cluster. During the installation of each product select:
- The option to be clustered.
-
A name for the cluster.
Note: This must be the same name across the 1SMS cluster, but unique to any other clusters on the same network.
-
A clustering algorithm (round-robin). For other clustering algorithms, refer to the relevant WebLogic documentation
-
A Unicast mode of clustering. For other modes, refer to the relevant WebLogic documentation
DO NOT install 1Workflow Engine at this point.
Note: The domain and AdminServer configuration are the same between the two installations. Point the node manager to the host of the appropriate machine using the address of the actual machine.
1Plan
Install 1Plan as during a standard installation but make sure to use the machine of the AdminServer as a Listen Address. (see Installing 1Plan).
1Transact
Install 1Transact as during a standard installation but make sure to use the machine of the AdminServer as a Listen Address (see Installing 1Transact).
1Validate
Install 1Validate as during a standard installation but make sure to use the machine of the AdminServer as a Listen Address (see Installing 1Validate).
1Workflow
Install 1Workflow Worklist as during a standard installation but make sure to use the machine of the AdminServer as a Listen Address (see Installing 1Workflow).
1Exchange
Install 1Exchange as during a standard installation but make sure to use the machine of the AdminServer as a Listen Address. Ensure that you use the Load Balancing option in the installer and configure GO Loader and GO Publisher products. (See Installing 1Exchange).
Install the suite on the subsequent machines
This follows the standard 1SMS installation (1SMS Installation Wizard) and sets the servers as a unicast cluster. During the installation of each product select:
- The option to be clustered.
-
Select a name for the cluster.
Note: This must be the same name across the the 1SMS cluster, but unique to any other clusters on the same network.
- A clustering algorithm (round-robin). For other clustering algorithms, refer to the relevant WebLogic documentation
- A Unicast mode of clustering. For other modes, refer to the relevant WebLogic documentation.
DO NOT install 1Workflow Engine at this point.
Note: This installation uses the same names for clusters, schemas and AdminServer configuration as the first machine installation.
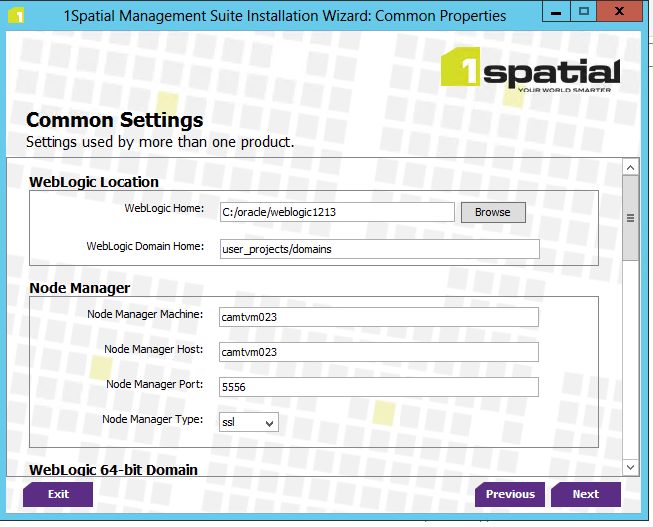
Common settings
-
Set the Node Manager Machine and Host to the Node Manager on the second machine.
-
Set the domain and Admin Server (the same for both installations).
1Plan
1Transact
1Validate (Interface only)
Note: Do not install processing nodes as these will be configured later.
Worklist
1Exchange
- Shut down the first installation of 1Exchange.
- If using Snowflake components, copy goloader.xml, gopublisher.xml, goloader folder, gopublisher folder (located in the domain directory) from the 1st machine to the 2nd machine.
-
Copy the jackrabbit folder (located in the root weblogic directory) from the 1st machine to the 2nd machine. Update the jackrabbitrepositry.xml to refer to the second machine.
Jackrabbit repository.xml
<Cluster id="secondmachine" syncDelay="200">
<Journal class="org.apache.jackrabbit.core.journal.OracleDatabaseJournal">
<param name="driver" value="javax.naming.InitialContext"/>
<param name="url" value="jdbc/ExchangeRepository"/>
<param name="schemaObjectPrefix" value="journal_"/>
</Journal>
</Cluster>
- Install 1Exchange as during a standard installation but make sure to use the other machine. Rename the server to be different to the previous installation.
-
Select the option Using Load Balancer and enter the load balanced host and port.
-
Select the option to be clustered. Select a name for the cluster, a clustering algorithm (round-robin) and a Unicast mode of clustering.
- Do not configure the exchange products.
- Start the first 1Exchange server when installation finishes.
Finalising Installation
Finish security configuration
- Shut down all associated servers, including the admin server of the SOA domain and the admin server of the Standard Domain.
- Copy the ms-common-weblogic-security-provider.jar from the lib directory of the first domain (the one that has the admin server running) to the same location on the second server.
- Restart all servers again and verify you can log in to both addresses.
1Validate Processing Nodes
- Go to WebLogic Admin Console>Servers>Configuration
- Select the MSValidateProc1 server>Click Clone
-
Create a new processing node server by targeting the listen port to the second machine and then changing the name and port of the server.
-
Click on the newly created Processing Node and navigate to General and change the machine name to the name of the second machine.
- If desired, repeat steps 2-5 for another processing node.
-
Start the servers.
Finish 1Exchange Installation
-
In the WebLogic Administration console for the 1Exchange domain , shut down the second installation of 1Exchange and update the following Server Start parameters to point to the correct host for the second machine :
- Start the second 1Exchange Server
-
Install only the GO Loader and GO Publisher products onto the first 1Exchange installation.
- Restart the server after the product configuration.
- Verify that Admin Configuration and Products are available in both installations using the Exchange Admin console for each server.
- In the WebLogic Administration console for the 1Exchange domain, navigate to Data Sources and target the GoPublisher[ExchangePolicyName]FeatureDS and GoLoader[ExchangePolicyName]FeatureDS to the 1Exchange cluster (e.g. MSExchangeCluster) and all servers in the cluster.
Install 1Workflow Engine
- Shut down the second SOA server (soa_server2).
- Start the installation.
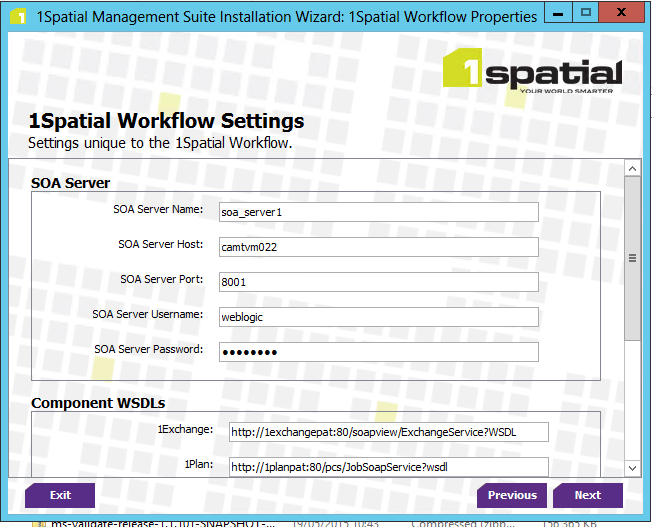
-
Set the SOA Server configuration pointing to the configuration of soa_server1.
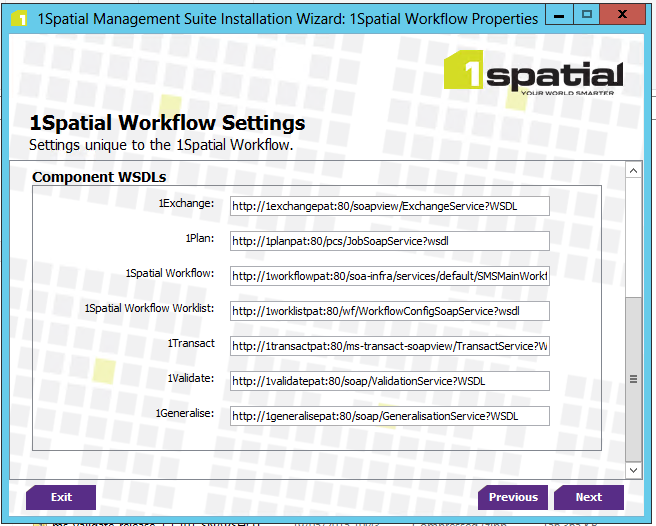
-
Set the component WSDLs to the load balanced endpoints of the applications.
- Verify the installation is successful.
-
In the WebLogic administration console, copy the server start parameters from the installed SOA instance (soa_server1) to the second instance (soa_server2) they will be similar to:
-DadminServerHost=[FirstMachine]
-DadminServerPort=7001
-DadminServerUserName=weblogic
-DadminServerPassword=[password]
- Restart the soa_server2.
- When started, verify that in the Enterprise Manager 1Workflow is deployed to both servers.
Configuring the 1Workflow Callback URL
It is important to configure a Callback URL so that when a product is called back to 1Workflow it uses the load balanced endpoint, i.e. to aid the resilience of 1Workflow.
- Log in to the Enterprise Manager console.
- Select the SOA instance>soa-infra>soa_server1.
-
Select Common Properties.
-
Set the Callback Server URL to the load balanced endpoint (ensure that you remove any auto-filled passwords and usernames).
- Restart the soa_servers.
Verification of Installations
-
Verify the load balanced endpoints retrieve the appropriate WSDLs:
- http://[1PlanLoadBalancedEndpoint]/pcs/JobSoapService?wsdl
- http://[1workflowLoadBalancedEndpoint]/soa-infra/services/default/SMSMainWorkflow/SMSMainWorkflowClient_ep?WSDL
- http://[worklistLoadBalancedEndpoint]/wf/WorkflowConfigSoapService?wsdl
- http://[1validateLoadBalancedEndpoint]/soap/ValidationService?WSDL
- http://[1transactLoadBalancedEndpoint]/ms-transact-soapview/TransactServic?WSDL
- http://[1exchangeLoadBalancedEndpoint]/soapview/ExchangeService?WSDL
- Verify that you can log in and the applications on both servers load.