
Layers
Features are managed using a series of ordered layers within a style (see Map Styles).
A layer can be used to display a vector geometry, a raster file, a Web Map Tile Service (WMTS), or text based on a vector geometry. You can have multiple layers that reference the same class.
You can specify colours and text that will be used to display features on the map, use background raster or map service layers, and specify which feature types will be displayed on the map.
Re-ordering or Removing Features
Layers are displayed from the bottom-most layer upwards.
To remove a feature layer from the Style list, select it and click Remove. The feature will no longer be displayed on the map, but can be added back again by selecting Add from the Style page.
Drag and drop feature layers in the Style list to determine in what order specific layers appear on the map.
Editing Features
Click on a feature layer to display the attributes that can be edited.
For vector items, you can change the colour of a feature's Fill, Stroke or Point styles using sliders.
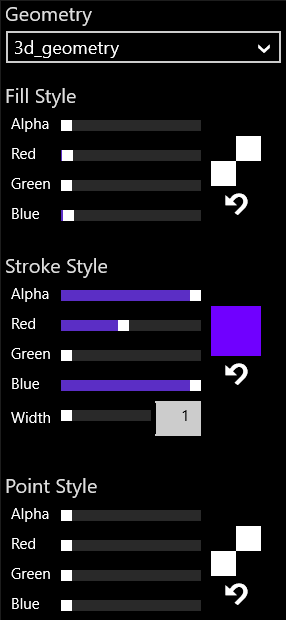
You can also change the width of a stroke (in pixels) using the Width slider, or by entering a value.
Note: To adjust the opacity of a colour, use the Alpha slider.
For text items, you can change the colour of the text, the font family, weight and size.
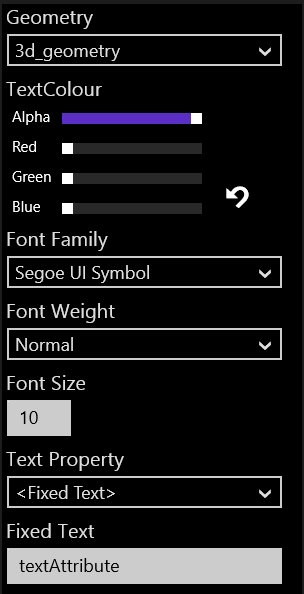
Use the colour sliders to adjust the text colour, select a font style from the Font Family list, and enter a font weight and size.
You can select the text to be displayed from the Text Property list. Either select a value from one of the string, integer, or enumeration properties, or if <Fixed Text> is selected, you can enter the exact text to be displayed in the Fixed Text field.
Note: To adjust the opacity of a colour, use the Alpha slider.
Vector Layers
There are two types of vector layer that can be added:
- Simple - specify attributes for a specific class
- Thematic - specify attributes depending on the value of a property in that class
To add a vector layer, click the Vector Layer button in the Styles page, then select Simple or Thematic.
![]()
For both Simple and Thematic layers, a list of classes is displayed, from which you can select a class to add to the list.
Note: To display secondary geometries, add a vector layer. When you add a vector layer, you can select which geometry to draw for the layer. To display more than one geometry of a feature, add vector layers for each geometry.
Adding Simple Vector Layers
Once a feature class has been selected for a Simple Vector Layer, the symbology options are displayed and can be edited.
Adding Thematic Vector Layers
Once a feature class has been selected for a Thematic Vector Layer, the layer must be configured.
Select the feature class from the styles list, then click the Configure button.
![]()
For each different property value that requires a different symbology, click Add Rule. A rule allows you to define a property value and the styles to use when drawing features whose property equals the specified property value.
A default rule can also be added, to define the style behaviour for when no other rules are satisfied. Any features that are not identified by any other rule will be drawn in the default rule style, otherwise these features will not be drawn (but are still selectable). Click Add Default Rule, and then define the style options.
Text Layers
There are two types of text layer that can be added:
- Simple - specify text attributes for a specific class
- Thematic - specify text attributes depending on the value of a property in that class
To add a text layer, click the Text Layer button in the Styles page, then select Simple or Thematic.
![]()
For both Simple and Thematic layers, a list of classes is displayed, from which you can select a class to add to the list.
Adding Simple Text Layers
Once a feature class has been selected for a Simple Text Layer, the text styling options are displayed and can be edited.
Adding Thematic Text Layers
Once a feature class has been selected for a Thematic Text Layer, the layer must be configured.
Select the feature class from the styles list, then click the Configure button.
![]()
For each different property value that requires a different symbology, click Add Rule. A rule allows you to define a property value and the styles to use when drawing features whose property equals the specified property value.
A default rule can also be added, to define the style behaviour for when no other rules are satisfied. Any features that are not identified by any other rule will be drawn in the default rule style, otherwise these features will not be drawn (but are still selectable). Click Add Default Rule, and then define the style options.
Raster Layers
You can use a raster layer to add a raster image background to the map.
Note: There can only be one raster layer in a style; however, that raster layer can contain many GeoTiff files. You can add and remove files from this single layer.
To add a raster layer, click the Raster Layer button in the Styles page, navigate to the file you want to use, select it, and click Open.
![]()
Only GeoTiff files that are in the same SRID as the vector data are shown. Adjust the Opacity if required.
Note: 1Edit uses the Windows libraries for displaying GeoTIFFs and only some compression
techniques are supported by Windows. When saving the GeoTIFF files, use the JPEG
compression technique and the BIP interleaving type to ensure the images can be loaded
by 1Edit.
A good test is to view the image file in Windows Explorer to see if it
can show you a thumbnail. A visible thumbnail means that 1Edit should be able to
display the GeoTIFF.
WMTS (Web Map Tile Services) Layers
You can display OGC Web Map Tile Services (WMTS) data as a backdrop to vector data by adding WMTS layers to the style.
WMTS using either KVP or REST request encodings are supported. The default style for a layer will be automatically picked and the coordinate reference system of the tiles must be the same as the vector data being displayed.
Note: Only one WMTS layer can be enabled at once. You can have many WMTS layers in the style to allow you to easily switch between them, but when you enable a WMTS layer, any other WMTS layers in the style will be disabled.
Click WMTS Layer to add a WMTS layer, then specify the URL of the WMTS layer to add.
![]()
Press Refresh to read the capabilities document and populate the list of layers and the list of Tile Matrices. When populated, you can select which layer to display and which Tile Matrix to use.
Note: Only the default style for each layer is used; dimensions or GetFeatureInfo requests are not supported.
Specify the URL to the service as follows:

Copyright © 2017 1Spatial

